Getting started with the Venafi Firefly Playground.
Overview
This quick-start playground is intended to showcase Venafi's Firefly ephemeral CA in the shortest possible time. Assuming the following prerequisites, it should take less than 60 seconds to deploy a fully functioning Firefly instance in a Github CodeSpaces or local Docker environment.
For simplicity the demo will use a built in certificate authority CA provided by as part of the Venafi Cloud service.
Architecture
The following diagram provides a high level architectural overview that shows the outcome of what we will be building:

Prerequisites
This playground can be run in one of two ways as follows:
| Option | Description |
|---|---|
| GitHub CodeSpaces | This is the quickest and easiest way to get started as there are no local dependencies. The codespace includes everything you need to try Firefly in your own GitHub dev container. |
| Local Docker | This option can be used to run Firefly on your local machine and has additional dependencies |
- Run directly from GitHub CodeSpaces - no local dependencies
- Clone the repository and run in your own Docker environment - with local dependencies ffdsfds
Dependencies
The following prerequisites can be used to run the Firefly playground in a GitHub CodeSpaces environment. This easiest and quickest way to get started and has no local dependencies and can be run entirely in a browser.
- A working GitHub account
- Venafi Cloud account for Firefly - you can signup for a free 30 day trial here
- An API key for your Venafi Cloud account. Use the instructions in the info panel below to get your API key.
The following prerequisites can be used to run the Firefly playground in your own Docker environment. This option has has mandatory and some optional local dependencies.
- Access to a fairly recent Docker runtime environment
- Venafi Cloud account for Firefly - you can signup for a free 30 day trial here
- An API key for your Venafi Cloud account. Use the instructions in the info panel below to get your API key.
- The following utilities are not required to run the Firefly playground but are used as a convenience to quickly demonstrate the Firefly API.
- Locally installed (cURL)[https://curl.se] command line utility
- Locally installed (JQ)[https://jqlang.github.io/jq/] command line utility
- Locally installed (OpenSSL)[https://www.openssl.org] command line utility
- Locally installed (JWT)[https://github.com/mike-engel/jwt-cli] command line utility
Getting an API Key
If you don't have an API key you can follow this steps:
- Login to https://ui.venafi.cloud. If you don't already have an account you can sign-up for a 30 day trail.
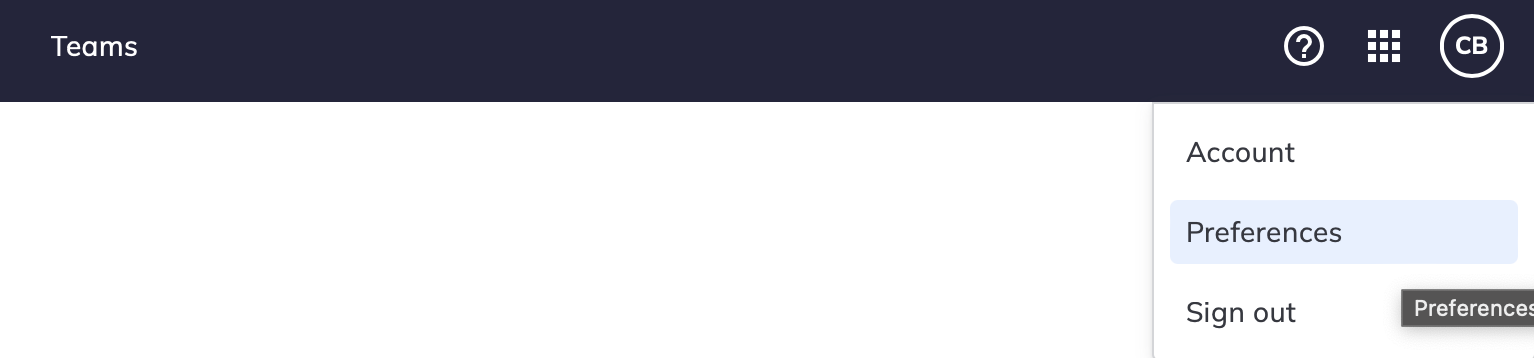
- In the menu bar, click your avatar in the top-right corner, and then click Preferences.
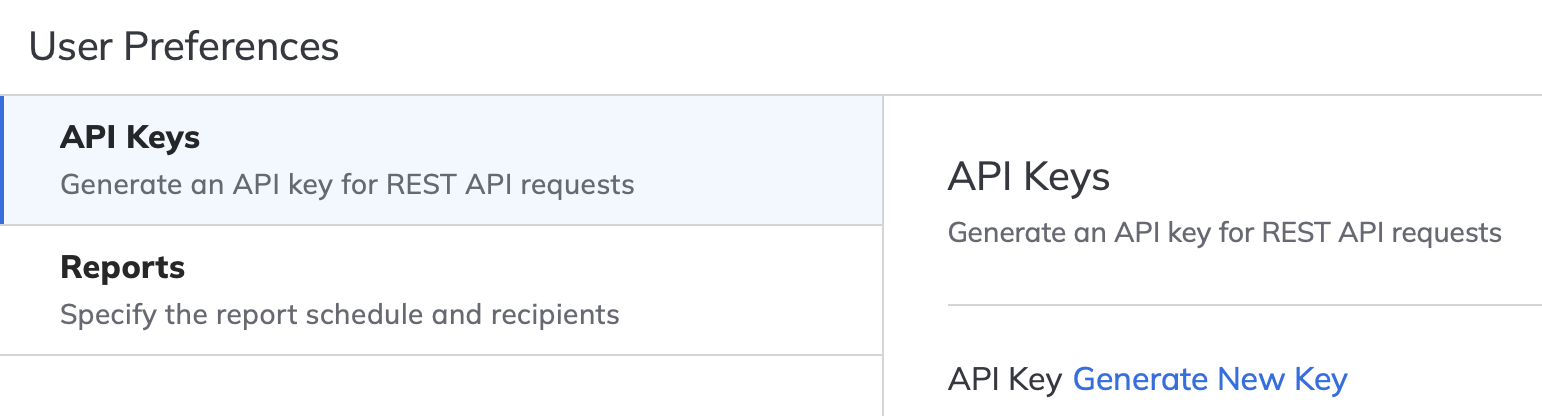
- Click the "Generate New Key" link, then specify the "API Key Validity Period". Recommend 30 days.
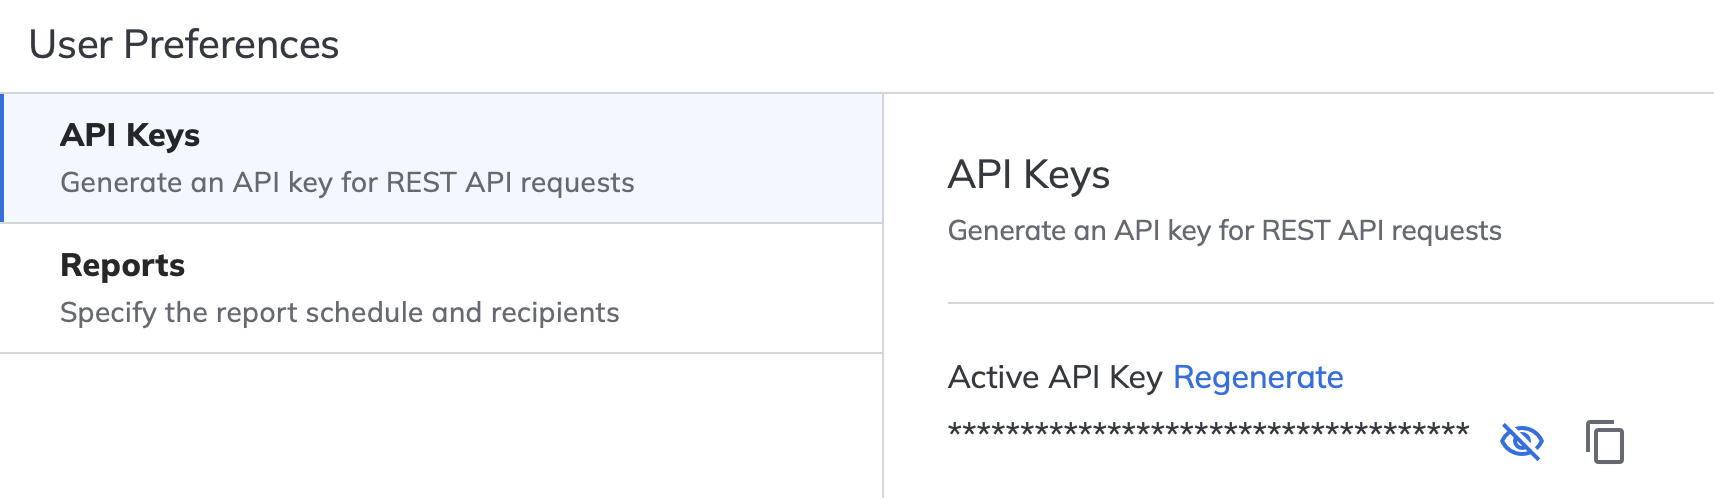
- Click the "Generate" button at the bottom of the page. You will then see options to view or copy the new key. Keep a note of the API key somewhere secure for later
Audience
The intended audience for this playground is:
- New or existing Venafi customers wanting to quickly see Firefly working within their own environments.
- InfoSec teams wanting to learn more about service that they can provide to cloud native developers, SRE's and platform engineering teams.
- Developers, SRE's and platform engineering teams wanting to learn more about the services that Info Sec teams should be providing
- Internal Venafi staff wanting to demonstrate Firefly to partners and customers.
Getting Started
The quick-start demo runs entirely in Docker and consists of three container images that a pulled from the public Docker repositories.
3goats/elevate - This a utility application that automates all of the required Venafi SaaS (control plane tasks) that would ordinarily be performed by an InfoSec team. Whilst these tasks can be performed manually, the utility helps by fully automating the configuration, thus new users get to see Firefly working much quicker.
tr1ck3r/jwt-this - jwt-this (pronounced "jot this") is a command line utility I created to simplify demonstration, evaluation, and simple testing with Venafi Firefly. When run, it generates a new signing key pair, uses it to sign and output a new JSON Web Token (JWT) containing specified Firefly-related claims, and starts a basic HTTP server (listening on port 8000 by default) where the signing public key is published via a JSON Web Key Set (JWKS) so it can be used by Firefly to verify the signature of the JWT.
public.ecr.aws/venafi-images/firefly - This is the main Firefly instance that will be initialised for the demonstration
To start the demo using Github CodeSpaces, use the steps in following info panel.
Launching the Firefly Playground using Github CodeSpaces
A codespace is a development environment that's hosted in the cloud. The Firefly playground GitHub repository provides a custom dev container that includes all of the prerequisites that are required:
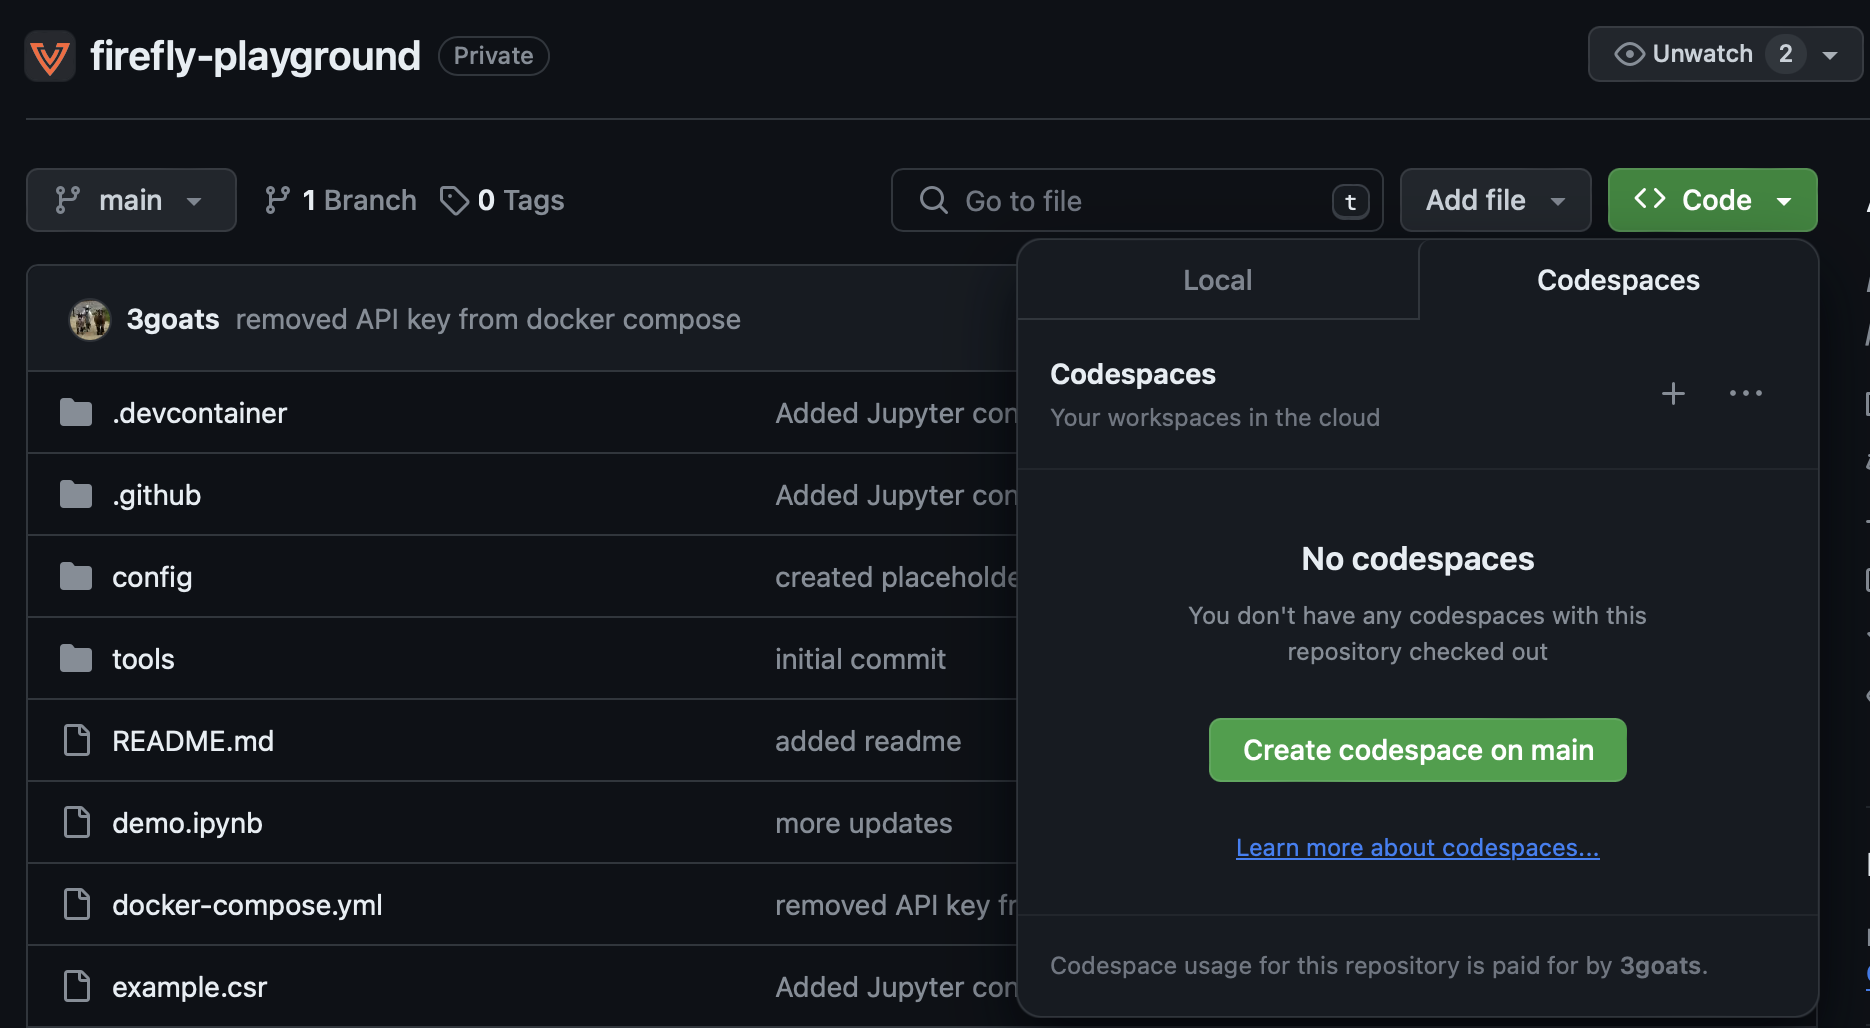
- Login to your GitHub account and goto https://github.com/Venafi/firefly-playground
-
Create a new CodeSpace by clicking on the "Code" button, then "Create codespace on main" e.g.
-
This will build and launch a new dev container which will take a few minutes to complete. You should then see a new development environment. e.g.
Important
Before you start using the new CodeSpace wait for the PostCreateCommand to finish installing the dependencies for the dev container.
Running the Firefly Demo
To simplify the this demonstration, the project includes an interactive Jupyter (formerly IPython Notebook) notebook that includes all of the required commands. However, please note that this does not include some of the Docker commands which must be run from the terminal. To continue open the demo.ipynb file and follow the steps from there.
Important
Before you can run Firefly, you must edit the .env file to include a valid Venafi cloud API key (referenced in the prerequisites) at the placeholder. This is the only thing you need to change.
The first task in the demo creates a .env file that is used to store a variable for the API key.
e.g.
At this point you can either follow the instructions here and cut/past the commands into the terminal in the codesdpace, or just step through and run each of the cells in the demo.ipynb interactive notebook file.
Step 1 - Configure the control plane
Every Firefly instance requires a valid service account, configuration and policy in the Venafi Control Plane (TLS Protect Cloud). For production, this task would often be completed by your InfoSec team. However, it might be undertaken by the platform engineering teams. Either way, you need to login to https://ui.venafi.cloud to create various config items.
To simplify this process and reduce the time it takes to get started, we will use the prebuilt 3goats/elevate container that fully automates the creation of the service account, configuration and policy. It will also create a private key file private-key.pem and local firefly config.yaml in the config directory.
To do this use the following docker compose command. This will run only the 3goats/elevate container.
Important
Do not run the docker commands in the interactive demo.ipynb environment. Instead type or cut and past the commands into the terminal.
You should see the following output.
[+] Running 2/0
 ✔ Network firefly-quickstart_default      Created  0.0s
 ✔ Container firefly-quickstart-elevate-1  Created  0.0s
Attaching to elevate-1
elevate-1  |
elevate-1  | bootstrap:
elevate-1  |   vaas:
elevate-1  |     url: https://api.venafi.cloud
elevate-1  |     auth:
...
elevate-1 exited with code 0
The following files should now have been updated to include valid content in the ./config directory.
- config.yaml - This is a generated Firefly configuration that will be used to pass the Firefly instance some basic values that are required as part of the bootstrap process,
- private-key.pem This is the private part of a generated key pair that will be used by firefly to authenticate to the Venafi Cloud control plane.
If you take a look at the config.yaml it will look something like this:
 bootstrap:
   vaas:
     url: https://api.venafi.cloud # (1)
     auth:
       privateKeyFile: /etc/firefly/private-key.pem  # (2)
       clientID: 8104b51c-bf7e-11ee-9c78-4a98e9dd68c7  # (3)
     csr:
       instanceNaming: Firefly Playground # (4)
 server: # (5)
   rest: # (6)
     port: 8281 # (7)
     tls: # (8)
       dnsNames: # (9)
       - firefly.venafi.example
       ipAddress: 127.0.0.1 # (10)
- This is the url for the Venafi control plane API.
- The path to the private key that will be used to authenticate the Firefly instance to the Venafi control plane. The corresponding public key is stored in the control plane definition for the service account.
- This is a reference to the
clientIDthat will be used to authenticate the Firefly instance. - A name that will be used to identify the Firefly instance in the control plane.
- Firefly will run in server mode and expose networking ports. Firefly can also run in Kubernetes operator mode and will not expose networking ports.
- Firefly will expose a REST API. Firefly supports REST, GraphQL and gRPC.
- The port used for the REST API.
- Define the TLS configuration for the REST API.
- A list of FQDN's that will be used to represent the Firefly instance in the auto generated TLS certificate used for the REST API.
- The IP address used for the REST API.
Firefly Configuration file
Click on the + symbols in the output above to learn more about how Firefly uses the local config.yaml file.
Step 2 - Start Firefly and the local JWT service
Now that we've configured the Control Plane, we can now start the Firefly container public.ecr.aws/venafi-images/firefly and the tr1ck3r/jwt-this.
To do this use the following docker compose command. The --profile firefly flag tells Docker to run only the public.ecr.aws/venafi-images/firefly and the tr1ck3r/jwt-this containers.
This will create 2 containers
You should see the following output.
docker compose --profile firefly up
[+] Running 2/0
 ✔ Container firefly-playground-jwt-this-1  Created                                                                                                                   0.0s
 ✔ Container firefly-playground-firefly-1   Created                                                                                                                   0.0s
Attaching to firefly-1, jwt-this-1
jwt-this-1  | Token
jwt-this-1  | =====
jwt-this-1  | eyJhbGciOiJFUzI1NiIsImtpZCI6Im8weWttRGFUTDZhU283WnVGUFRQaDVKbWdkYjBjVnVJMklLX1lUQ0ZtQmciLCJ0eXAiOiJKV1QifQ.eyJleHAiOjE3MDczOTUzOTksImlhdCI6MTcwNzMwODk5OSwiaXNzIjoiaHR0cDovLzE3Mi4xOC4wLjI6ODAwMCIsInN1YiI6Imp3dC10aGlzIiwidmVuYWZpLWZpcmVmbHkuYWxsb3dBbGxQb2xpY2llcyI6ZmFsc2UsInZlbmFmaS1maXJlZmx5LmFsbG93ZWRQb2xpY2llcyI6WyJCYXNpYyBEZW1vIl0sInZlbmFmaS1maXJlZmx5LmNvbmZpZ3VyYXRpb24iOiJCYXNpYyBEZW1vIn0.PM0S76Dp47GDV6lnKxTYQdi2rlNpTsCFHAZdJRJWSvqm6Vu8jdjBAm3DYL9wxJV0j-RK_d5w2s2x-lv7zaUizQ
jwt-this-1  |
jwt-this-1  | Header
jwt-this-1  | ======
jwt-this-1  | {
jwt-this-1  |   "alg": "ES256",
jwt-this-1  |   "kid": "o0ykmDaTL6aSo7ZuFPTPh5Jmgdb0cVuI2IK_YTCFmBg",
jwt-this-1  |   "typ": "JWT"
jwt-this-1  | }
jwt-this-1  |
jwt-this-1  | Claims
jwt-this-1  | ======
jwt-this-1  | {
jwt-this-1  |   "exp": 1707395399,
jwt-this-1  |   "iat": 1707308999,
...
firefly-1   | I0207 12:30:00.469163       1 options.go:141] "msg"="process successfully set mlockall()"
firefly-1   | I0207 12:30:00.479032       1 client.go:195] "msg"="creating vaas client" "logger"="client"
firefly-1   | I0207 12:30:00.479230       1 client.go:241] "msg"="getting VaaS configuration" "logger"="client"
firefly-1   | I0207 12:30:01.090982       1 readyz.go:68] "msg"="adding readiness check" "logger"="agent.manager.readyz" "name"="signer/inmemory" "path"="/readyz"
firefly-1   | I0207 12:30:01.091020       1 client.go:195] "msg"="creating vaas client" "logger"="agent.bootstrap.vaas.client"
...
firefly-1   | I0207 12:30:02.061899       1 client.go:296] "msg"="retrieve issued intermediate certificate from VaaS" "logger"="agent.bootstrap.vaas.client"
firefly-1   | I0207 12:30:02.169560       1 vaas.go:123] "msg"="issued intermediate certificate from VaaS" "CN"="Firefly Playground Issuer" "id"="9d03a130-c5b4-11ee-b282-75b352d68206" "logger"="agent.bootstrap.vaas"
firefly-1   | I0207 12:30:02.172270       1 inmemory.go:49] "msg"="stored in memory certificate private key bundle" "logger"="agent.signer.inmemory"
firefly-1   | I0207 12:30:02.172303       1 renewer.go:135] "msg"="fetched intermediate certificate from bootstrap" "CN"="Firefly Playground Issuer" "logger"="agent.agent_renewer"
firefly-1   | I0207 12:30:02.172324       1 renewer.go:169] "msg"="waiting to renew certificate" "logger"="agent.agent_renewer" "renew_time"="2024-04-07 12:29:51 +0000 UTC"
firefly-1   | I0207 12:30:02.172328       1 tls.go:144] "msg"="signing tls certificate" "logger"="agent.server.rest.tls"
firefly-1   | I0207 12:30:02.173788       1 tls.go:169] "msg"="signed tls certificate" "logger"="agent.server.rest.tls" "renewal_time"="2024-02-08T04:30:02Z"
Note
The above command runs docker in interactive mode which means that the process does not exit. Be careful not to accidentally exit the process.
Step 3 - Create a new JWT
When running in server mode all certificate requests will require a valid JWT to be provided in the HTTP auth header. i.e. the request must include a
Lets use cURL get a JWT using using the jwt-this service. This creates a new environment variable $token that stores the token.
token=$( curl -H "Content-Type: application/x-www-form-urlencoded" \
     -X POST http://localhost:8001/token \
     -k -s |  jq -r  '.access_token' )
You can decode and see the JWT content using a nifty trick with the jq command. e.g.
{
  "alg": "ES256",
  "kid": "fsX3WvpPBwpi_YK91dCulTrSQj6ogkGKb6V58Pj7Eaw",
  "typ": "JWT"
}
{
  "email": "user1@acme.com",
  "exp": 1707401178,
  "iat": 1707314778,
  "iss": "http://172.18.0.2:8000",
  "sub": "jwt-this",
  "venafi-firefly.allowAllPolicies": false,
  "venafi-firefly.allowedPolicies": [ # (1)
    "Firefly Playground"
  ],
  "venafi-firefly.configuration": "Firefly Playground" # (2)
}
- Determines what certificate issuing policies the requestor is allowed to use
- Determines what Firefly configuration the requestor is allowed to use
Note the venafi-firefly.allowAllPolicies, venafi-firefly.allowedPolicies and venafi-firefly.configuration fields.
Step 4 - Create a Certificate Signing Request (CSR)
Before we can request a new certificate we first need to create a Certificate Signing Request (CSR). To keep things simple we'll just use openssl to create this. We'll then store it as another environment variable called $csr. Because we need to format the CSR as JSON string this is a 2 step process.
# Step 1. (1)
tmp=$(openssl req -nodes -newkey rsa:2048 -keyout example.key -out - -subj "/C=GB/ST=London/L=London/O=Global Security/OU=IT Department/CN=test.example.com" 2>/dev/null)
# Step 2. (2)
csr=$( jq -n --arg string "$tmp" '$string' | tr -d '"' )
- Store's the CSR in PEM format
- Formats the PEM formatted CSR as JSON string that be sent to Firefly
Step 5 - Request a certificate
Now that we have both a JWT and a CSR we can make a request to our Firefly instance.
The following cURL command sends a simple JSON data structure to Firefly that contains the CSR and a reference to the policy that will be used to fulfill the certificate request. The policy reference must correspond to one of the venafi-firefly.allowedPolicies within the JWT.
curl 'https://localhost:8289/v1/certificatesigningrequest' \
--header 'Content-Type: application/json' \
 -H "Authorization: Bearer $token" \
--data '{
    "request": "'"$csr"'",
    "policyName": "Firefly Playground"
}' -k -s
You should see output similar to the following. Note: The response includes the following certificates which are returned in the order listed:
- The entity/leaf certificate itself
- The intermediate certificate for the
Firefly SubCAused to sign the requested entity/leaf certificate - The intermediate/SubCa certificate for the
Sub CA Provideras listed in the Venafi Control plane
Tip - Getting a valid PEM format
Because the output is returned as a JSON data structure it will be JSON encoded and the certificate chain will be on a single line. This will not work with your applications that typically require a PEM format which includes newlines. You can use the JQ utility to reformat the certificate chain and remove the JSON encoding. To do this pipe the output to JQ and specifiy the -r for raw flag.
curl --location 'https://localhost:8289/v1/certificatesigningrequest' \
--header 'Content-Type: application/json' \
 -H "Authorization: Bearer $token" \
--data '{
    "request": "'"$csr"'",
    "policyName": "Firefly Playground"
}' -k -s | jq -r .certificateChain
This will produce a PEM output that will probably be more useful and can be used directly by your applications.
    -----BEGIN CERTIFICATE-----
MIICgDCCAiagAwIBAgIRALcojaIkJtPIm7suinBqQPgwCgYIKoZIzj0EAwIwFjEU
MBIGA1UEAxMLRGVtbyBJc3N1ZXIwHhcNMjQwMjEwMTEzMjAzWhcNMjQwNTEwMTEz
MjAzWjBAMQ4wDAYDVQQHEwVTb2ZpYTEVMBMGA1UEChMMVmVuYWZpLCBJbmMuMRcw
FQYDVQQDDA51c2VyMUBhY21lLmNvbTCCASIwDQYJKoZIhvcNAQEBBQADggEPADCC
AQoCggEBAK1whkeg9ucVyPCB/Kyur6w3WzVepUT03tzF8GHSRbT6RXdwGPcq/ck7
X3/D3mPuU2S3HL7FjpNIEi3pXJazjQBFxzKaKqlYorkcEs7IPwDa+xgMUubCBK7/
1i27HmMo0yBRtrN6ulUNsuTFhXUsQpLThtOTafcGjwau7grIp9IXmYrvdkS9HQOs
YATxN3HM9FMaUNWrF/p7iaMNSMttnLu7aGVUe5O15i1C9ixzlc4u0SU0ZR6K722z
2EuFNQtQzsXKBobqmvMUo3Pi4HUuDQ4W79TEEBoWHdotCZY+NO153+bBCVdh/nwO
gzkya5+atFNFdr6EetegN/yoxrb4sAUCAwEAAaNgMF4wDgYDVR0PAQH/BAQDAgWg
MB0GA1UdJQQWMBQGCCsGAQUFBwMBBggrBgEFBQcDAjAMBgNVHRMBAf8EAjAAMB8G
A1UdIwQYMBaAFJZxTTv0xv8Kc2mLIjlXunAOoCiuMAoGCCqGSM49BAMCA0gAMEUC
IQDQcZHeoZ2ngis5LAsG4cLAng+CyVYEnyCMG9/cGZdEVgIgal9HjdkasP1DeRga
K3i8pw9dTr40mvhPVtQwYQw03cM=
-----END CERTIFICATE-----
-----BEGIN CERTIFICATE-----
MIIDtTCCAp2gAwIBAgIUaafwxTAoCEc2EkPeII39lnt8y/UwDQYJKoZIhvcNAQEL
BQAweDELMAkGA1UEBhMCVVMxFTATBgNVBAoTDFZlbmFmaSwgSW5jLjERMA8GA1UE
CxMIQnVpbHQtaW4xPzA9BgNVBAMTNkRlZGljYXRlZCAtIFZlbmFmaSBDbG91ZCBC
dWlsdC1JbiBJbnRlcm1lZGlhdGUgQ0EgLSBHMTAeFw0yNDAyMTAxMTExNTdaFw0y
NDA1MTAxMTEyMjdaMBYxFDASBgNVBAMTC0RlbW8gSXNzdWVyMFkwEwYHKoZIzj0C
AQYIKoZIzj0DAQcDQgAEresHmPd1pKTqTD5Cob8O0VVgm+3rMnJGpBRidsV2AguR
xUFLtjq5VdWqx+RjVSHyZ6n+r1jyVPE20Q90Bo+wFqOCAWIwggFeMBIGA1UdEwEB
/wQIMAYBAf8CAQAwHQYDVR0OBBYEFJZxTTv0xv8Kc2mLIjlXunAOoCiuMB8GA1Ud
IwQYMBaAFCe55cW8WhjR9H0N3jhpvocPFjUCMIGCBggrBgEFBQcBAQR2MHQwcgYI
KwYBBQUHMAKGZmh0dHA6Ly9idWlsdGluY2EudmVuYWZpLmNsb3VkL3YxL2J1aWx0
aW5jYS9jYWNoYWluLzBkNDdhNTgxLTk1OGQtMTFlZC1iN2JjLWJmZTEyYmY1ZTUx
Ni1JbnRlcm1lZGlhdGVDQTBzBgNVHR8EbDBqMGigZqBkhmJodHRwOi8vYnVpbHRp
bmNhLnZlbmFmaS5jbG91ZC92MS9idWlsdGluY2EvY3JsLzBkNDdhNTgxLTk1OGQt
MTFlZC1iN2JjLWJmZTEyYmY1ZTUxNi1JbnRlcm1lZGlhdGVDQTAOBgNVHQ8BAf8E
BAMCAoQwDQYJKoZIhvcNAQELBQADggEBAHr/CzXpoq5XGWWBQIgWCka4cQKisSK5
wJAVY771mcwxjt0kfQh7jKzI6gH/xGJIeWXIbzAnIIAMItWWNeVnCJfQD8rkDPdC
IyrscWUzZJIxxqeNt0oV4a8qV5OAY24ODRo9vYdR1wqKE0CPAYLFAzgIZSR4aQY5
FYMl2Hk1XoY67nYlSBLr2IcletACpHmt83GjBKyeT0VX00AEqO7Z9cDQ/Iq3qInC
dLxuPbSd+0cPM6mQEcVrZpkzqYSWYgkIm2BdPbYyQFUnFRICC0IGzz4+xfvLppRE
QDxLYgi8/MD8ebn9xuwZIyJZ4FgFbci49Df4qgPGgTRiE4cnED76wBc=
-----END CERTIFICATE-----
-----BEGIN CERTIFICATE-----
MIIEtzCCA5+gAwIBAgIUZLSN3/h90AM/RJcoX2beeYd1vqkwDQYJKoZIhvcNAQEL
BQAwZjELMAkGA1UEBhMCVVMxFTATBgNVBAoTDFZlbmFmaSwgSW5jLjERMA8GA1UE
CxMIQnVpbHQtaW4xLTArBgNVBAMTJERlZGljYXRlZCAtIFZlbmFmaSBDbG91ZCBC
dWlsdC1JbiBDQTAeFw0yMzAxMTYxMTAwMjlaFw0yODAxMTUxMTAwNTlaMHgxCzAJ
BgNVBAYTAlVTMRUwEwYDVQQKEwxWZW5hZmksIEluYy4xETAPBgNVBAsTCEJ1aWx0
LWluMT8wPQYDVQQDEzZEZWRpY2F0ZWQgLSBWZW5hZmkgQ2xvdWQgQnVpbHQtSW4g
SW50ZXJtZWRpYXRlIENBIC0gRzEwggEiMA0GCSqGSIb3DQEBAQUAA4IBDwAwggEK
AoIBAQDbB2x7ti8wNQFho7BhriBfOArJnh5blnuk+M0OO3LdBNWc0C0Kw7LusPAi
jL26iliHilX9jTcmSO/8fTnHmAJp2ZgtG6BBGUX+srez1i/oyGKn4ISPpLezvawy
qym4CBGcYkq6Ob9EaGX8kl7todPRvrkWBRQxX/iXnt1p+WBoqw3H4D/uZw1M2LRY
gxaqTwyjotOQmsfv/nN1Ylpn5Qc3glOTcIX9ijP7EvBpwIuSGE9zpuH6d7JCaV6t
mDr7Lk7KgCxSVaM7mBiZ3Nkf1JC+J805chUOCf4P5wOL8yGphYN8LsmpJgNw/gEo
dwl+dt96WfW29meEWos9pVY4/Y/VAgMBAAGjggFJMIIBRTAOBgNVHQ8BAf8EBAMC
AQYwDwYDVR0TAQH/BAUwAwEB/zAdBgNVHQ4EFgQUJ7nlxbxaGNH0fQ3eOGm+hw8W
NQIwHwYDVR0jBBgwFoAUxmQN0ktNODYkJmEFxskk7NhgrYowdQYIKwYBBQUHAQEE
aTBnMGUGCCsGAQUFBzAChllodHRwOi8vYnVpbHRpbmNhLnZlbmFmaS5jbG91ZC92
MS9idWlsdGluY2EvY2EvMGQ0N2E1ODEtOTU4ZC0xMWVkLWI3YmMtYmZlMTJiZjVl
NTE2LVJvb3RDQTBrBgNVHR8EZDBiMGCgXqBchlpodHRwOi8vYnVpbHRpbmNhLnZl
bmFmaS5jbG91ZC92MS9idWlsdGluY2EvY3JsLzBkNDdhNTgxLTk1OGQtMTFlZC1i
N2JjLWJmZTEyYmY1ZTUxNi1Sb290Q0EwDQYJKoZIhvcNAQELBQADggEBAJttmpUq
EXNfl3DLfWuMaFOrLWh5B/m5bPJXGtMKzJFN3MtLjiBRz5yq5BtRf4xHbEHYGk0h
N2jJo56zSR7H6YI0tmy/uPW0H9NNkVMBvOIX/qhOkVPWMCmJY82qI5bv4yAgClXY
xBaA2IaATA+ZAd9IvJdyLnkKxkKz1vP2OwJ3eF3oX0gY5NnQNtXGUyAMfgyrJaCi
eKEwu5EVKVwoXYDyO3rrkKgnmzktyiKxtAij6sf3Z4CRDhrnfwGXJnv6DJHj1yFd
LHv2Zzh0jOjXXtvwoP5pvoOTkToVsTdW+KpBowracf19pS56ZbLtOOxIxX65FpGo
x4QlptWfjmdj2zI=
-----END CERTIFICATE-----